
Server Installation on a Pre-Installed Tomcat
This section of the document provides you the instructions for installing and configuring Kony MobileFabric Integration Service on a pre-installed Tomcat.
To install Kony MobileFabric Integration Service on a pre-installed Tomcat, follow these steps:
- Download the following Middleware with memcache artifacts from developer portal link.
- Middleware.war (under tomcat link)
- Admin.war (if required, under tomcat link)
- libraries - MIDDLEWARE-GA-<version>.tar
- install.zip
- middleware-bootconfig.tar
- DB specific jar
- Install Middleware: Place the middleware.war and admin.war war files under TOMCAT_LOCATION\webapps folder.
-
Extract the libraries MIDDLEWARE-GA-<version>.tar to Tomcat lib, i.e. TOMCAT_LOCATION\lib.
- Create a folder tc (if does not exist) under Tomcat lib TOMCAT_LOCATION\lib, and place tc jars in the folder created (if you are using a thin client application).
-
Also, place database related jars in Tomcat lib.
- Download mobileweb_paas_libs_<version>.tar from thin client artifacts and extract to tc in the Tomcat lib from http://developer.kony.com/PluginReleases.
- Extract install.zip to an external location (ex: D:\Servers\install) which we set it as middleware.home.
- Extract Middleware-bootconfig.tar into the following location under <middleware.home>\middleware\middleware-bootconfig.
Path: D:\Servers\install\middleware\middleware-bootconfig
Developer Portal Link: http://developer.kony.com/twiki/pub/Portal/Releases/GA-<version>/Middleware/Kony%20Server/
Note: Replace the <version> with the version number to download the artifacts.
Note: Assuming D:\Servers\apache-tomcat-8.0.21 is Tomcat location i.e. TOMCAT_LOCATION.
Changing the Tomcat Configuration
- Catalina.bat:
Set JAVA_OPTS=-server -Xms1024M -Xmx1024M -XX:PermSize=512M -XX:+UseConcMarkSweepGC -XX:+CMSIncrementalMode -XX:+HeapDumpOnOutOfMemoryError -XX:HeapDumpPath=D:/Servers/logs/heapdumps/tomcat -Djava.awt.headless=true -Djava.net.preferIPv4Stack=true -Dnet.spy.log.LoggerImpl=net.spy.memcached.compat.log.Log4JLogger - Catalina.properties:
- Content.xml located in Tomcat_Install/conf:
Change the <context> to <Context cookies="true" useHttpOnly="true" path="/">
Add <Manager pathname=""/>
Remove <WatchedResource>${catalina.base}/conf/web.xml</WatchedResource>
- Server.xml: Change the port numbers with $ variable names as mentioned in the code below to pick a value from catalina.properties.
<Server port="${tomcat_shutdown_port}" shutdown="SHUTDOWN"> <Connector address="${TOMCAT.BIND.IP}" port="${http_port}" protocol="HTTP/1.1" maxHttpHeaderSize="8192" maxThreads="150" enableLookups="false" acceptCount="25" disableUploadTimeout="true" server="Kony" tcpNoDelay="true" compression="on" compressableMimeType="text/css,text/javascript,text/html" connectionTimeout="20000" /> <Connector port="${ajp_port}" protocol="AJP/1.3" redirectPort="8443" />
- Tomcat-user.xml: Add a user 'manager' and roles under <tomcat-users> tab as shown,
<user name="manager" password="m@n@g3r123" roles="admin-gui,manager-gui,manager-script, manager-jmx,manager-status"> <role rolename="admin-gui"/> <role rolename="manager-gui"/> <role rolename="manager-script"/> <role rolename="manager-jmx"/> <role rolename="manager-status"/> <role rolename="manager"/>
- Web.xml: Replace the web.xml with installer generated entries which has Kony related tags.
# KonyOne Server installation directory
installdir=D:/Servers/

# Tomcat Bind IP Address
TOMCAT.BIND.IP=<system IP>/<localhost>
#TOMCAT.BIND.IP=<system IP>/<localhost>

# Use by the KonyOne Middleware to locate its configuration files
middleware.home=D:/Servers/install

# Node ID of this tomcat server instance
instance_id=1

# HTTP port used by this instance
http_port=9090
https_port=443
tomcat_shutdown_port=9105
ajp_port=8010


# HTTPS TCP port number (0 when HTTPS is not being used)
jks_path=D:/Program Files/Java/jdk1.7.0_51/jre/lib/security/cacerts
jks_password=changeit
keystore_file=
keystore_pass=
keystore_type=

# This selects the routing for all Kony transaction log messages
jms_selector=INFO,file
jms.enabled=true
Changing the Kony configuration
- In middleware.home/middleware/middleware-bootconfig,change the log4j.appender.FILE.File value to a different log location asD:/Servers/logs/metrics.log.
- Middleware.properties:
Change the property richclient.deploy=apps to richclient.deploy=lib/apps
- ssl.trustStore, ssl.keyStore property values change them to either java cacerts if you do not have specific certificates, else add specific keystore and trust store path. Similarly, fill ssl.trustStorePassword, ssl.keyStorePassword, ssl.keyStoreType, ssl.trustStoreType, ssl.algorithm.
If Kony Reports is enabled and Metrics Topic is configured (If you require metrics logging), then select metrics.logging property to true else false.
- Deployment-config.properties: Make config.usersdb.validation as false in deployment-config.properties under <middleware.home>/middleware/middleware-bootconfig/admin.
Middleware (Only) Installation
For only middleware installation, follow these steps
- We need to disable metrics.logging i.e. make it false in middleware.properties file.
-
Find serverconsole.properties file in the middleware-bootconfig\admin folder (for ex: D:\Server\install\middleware\middleware-bootconfig\admin) and comment out the admindb.jndi.name in the serverconsole.properties file.
- Start the server and access the following middleware URL:
<protocol>:<host>:<port>/middleware/MWServlet
HTTP GET not supported is the response from the server.
Middleware with Admin Installation
For Middleware with Admin installation, follow these steps:
-
We need to add one more resource entry in context.xml of tomcat conf.
<Resource name="jdbc/konyreportsdb" auth="Container" type="javax.sql.DataSource"
factory="org.apache.tomcat.jdbc.pool.DataSourceFactory"
driverClassName="com.mysql.jdbc.Driver" username="KONYADMINDB"
password="root" url="jdbc:mysql://localhost:3306/KONYREPORTSDB"
testWhileIdle="true" testOnBorrow="true" testOnReturn="false" validationQuery="SELECT 1"
validationInterval="30000" timeBetweenEvictionRunsMillis="30000"
initialSize="10" maxActive="30" minIdle="10" maxWait="10000" maxIdle="30"
removeAbandonedTimeout="300" removeAbandoned="true" logAbandoned="true"
minEvictableIdleTimeMillis="30000" jmxEnabled="true"/>
-
Disable metrics by changing metrics.logging=false.
- Add the below code in context.xml
<Resource name="jdbc/KDCDB" auth="Container" type="javax.sql.DataSource" maxActive="10"
maxIdle="5" maxWait="10000" scope="Shareable"
driverClassName="org.apache.derby.jdbc.EmbeddedDriver"
defaultReadOnly="true" url="jdbc:derby:${middleware.home}/derby/${instance_id}" />
<Resource name="jdbc/konyadmindb" auth="Container" type="javax.sql.DataSource" maxActive="2" maxIdle="2" maxWait="10000" scope="Shareable" factory="org.apache.tomcat.jdbc.pool.DataSourceFactory" username="root" password="root" driverClassName="com.mysql.jdbc.Driver" defaultReadOnly="true" url="jdbc:mysql://localhost:3306/KONYADMINDB?autoReconnect=true" testWhileIdle="true" testOnBorrow="true" testOnReturn="false" validationQuery="SELECT 1" validationInterval="30000" timeBetweenEvictionRunsMillis="30000" initialSize="1" minIdle="1" removeAbandonedTimeout="300" removeAbandoned="true" logAbandoned="true" minEvictableIdleTimeMillis="30000" jmxEnabled="true"/>
- Start the server and access the middleware and admin URLs
- Middleware URL: <protocol>:<host>:<port>/middleware/MWServlet
HTTP GET not supported is the response from the server
- Admin URL: <protocol>:<host>:<port>/admin
Admin portal access
- Middleware URL: <protocol>:<host>:<port>/middleware/MWServlet
ActiveMQ Middleware Configuration ( Message Oriented )
ActiveMQ is the an open source message broker written in Java together with a full Java Messaging Service (JMS). ActiveMQ Java file is used to handle messages from ActiveMQ.
To configure ActiveMQ in Tomcat follow these steps:
- Add the below properties to middleware-home/middleware/middleware-bootconfig/middleware.properties file.
#For #ActiveMQ metrics broker URL, db location, brokerName and clientID
are required.
metrics.clientID=KonyMetrics
metric.dblocation=D:/Tmp/metricsdata
metrics.brokerName=myAQBroker

#Metrics Topic Configuration
metrics.TopicName=jms/KonyMetricsTopic
metrics.TopicConnectionFactoryName=ConnectionFactory
metrics.providerURL=tcp://localhost:61616(IP and port depends on the server)
- Configure metrics log location in middleware-home/middleware/middleware-bootconfig/metrics-log4j.properties.
- Configure the proper dialect, JNDI and db type in middleware-home\ middleware\middleware-bootconfig admin\serverconsole.properties.
- Make sure you have configured middleware.home as -D param in the new Tomcat server under tomcat/conf/catalina.properties.
- Set the Report DB configurations as a part of context.xml in tomcat_install/conf.
- Copy the required DB driver JARs into tomcat/lib folder.
-
Copy activemq-all-5.11.1.jar to tomcat/lib/middleware/ folder (certified version jar is available with metrics or you can download the same from http://activemq.apache.org/activemq-5111-release.html).
- Copy the metrics.war to tomcat/webapps folder.
- Start the server.
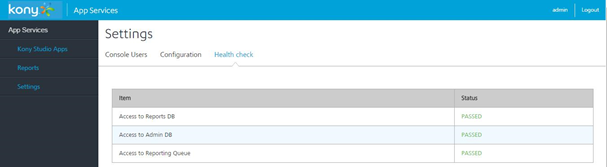
- Verify the MQ status by logging into Console and look for Health Check.
For metrics.ear installation in JBoss
-
Create Connection factory and Topic for metrics (log daemon replacement):
-
Go to <Jboss installation dir>/standalone/configuration location and create (or setup) JMS configuration including connection factory and topic edit standalone-full.xml as shown:
<connection-factory name="KonyConnectionFactory">
<connectors>
<connector-ref connector-name="netty"/>
</connectors>
<entries>
<entry name="java:jboss/exported/jms/KonyConnectionFactory"/>
</entries>
<compress-large-messages>false</compress-large-messages>
<failover-on-initial-connection>false</failover-on-initial-connection>
<use-global-pools>true</use-global-pools>
</connection-factory>
- Create entry for JMS topic for our metric system inside standalone-full.xml as shown:
Add the following entry above </hornetq-server>
<jms-destinations>
<jms-topic name="KonyMetricsTopic">
<entry name="java:jboss/exported/jms/KonyMetricsTopic"/>
</jms-topic>
</jms-destinations>
- Start the JBoss using standalone.bat, in following location <Jboss home>/bin
-
-
Create user for metrics database
- Create an application user (id can be admin or anything) and assign this user to JMS role as show below:
cd <Jboss installation dir>/bin
add-user.bat (Ex: D:\Servers\jboss-eap-6.2\bin\add-user.bat)
- Select the type of the user you wish to add.
Management User (mgmt-users.properties)
- Application User (application-users.properties)
Note: Select Application User to add to the metrics database.
- Upon selecting the type of user, enter the username (Ex: Admin) and password details of the new user to add.
- Assign a group to the created user. (Ex: Group - JMS)
-
Select Yes, to add the user for realm 'ApplicationRealm'.
- The created used will be added to the following files
Added user Admin to file - /DIB/JBOSS/jboss-eap-6.2/standalone/configuration/application-users.properties
- Added user Admin to file - /DIB/JBOSS/jboss-eap-6.2/domain/configuration/application-users.properties
- Added user Admin with group JMS to file - /DIB/JBOSS/jboss-eap-6.2/standalone/configuration/application-roles.properties
- Added user Admin with group JMS to file - /DIB/JBOSS/jboss-eap-6.2/domain/configuration/application-roles.properties
- Select Yes, if the new user will be used for one AS process to connect another AS process. Ex: For a slave host controller connecting to the master or for a Remote connection for server to server EJB calls.
-
To represent the user, add the following to the server-identities definition <secret value="YWRtaW5AMTIz" />.
- Create an application user (id can be admin or anything) and assign this user to JMS role as show below:
- Edit standalone-full.xml: Under < security-settings> tab, change the permissions of operation types to specified role.
-
Edit Middleware.properties file with the information about the connection factory topic.
- Edit the below properties with the created user values if the jboss version is 6.2,
metrics.securityPrincipalName = (ex: appuser)
metrics.securityCredentials = (ex: appuser@123)
metrics.userName = (ex: appuser)
metrics.password= (ex: appuser@123)
-
After validating middleware.properties, start the jboss instance as below
JBoss-Home>bin>standalone.sh –c standalone-full.xml
- Start the middleware instance.
-
Note: Access admin console and ensure the health check status under settings is PASSED for all
- Deployment of metric.war file
After successfully passing the health status (under Settings) in admin console, deploy (copy) metric.war file to standalone instance in the below location:
JBoss-Home>standalone>deployments>
Ex: D:\Servers\jboss-eap-6.2\standalone\deployments
Note: To view both legacy and other reports we can access it with admin module.
| Copyright © 2013 Kony, Inc. All rights reserved. |